31 Mei 2010

ILLUSTRATIONS : by ALEXIA SINCLAIR

Share


Illustrations : by Alexia Sinclair
Categories: Art Images » Illustrations

detail....
54 JPG | 430x667 - 1500x667 | 7.27 Мb

nak framekan artwork2 tersebut...
nah, ambil...

PAINTING : by MARTIN DESCHAMBAULT

Share


PAINTING : MARTIN DESCHAMBAULT

Art by Martin Deschambault
Categories: Art Images » Paintings

detail...
98 JPG | 1200X600 | 25 mb

rase mcm nk buat koleksi...
tekan, jgn segan

TUTORIAL : MEMBUAT DAUN 3D DARI FOTO TEKSTUR

Share
TUTORIAL : MEMBUAT DAUN 3D DARI FOTO TEKSTUR

Di dalam edisi totorial beginner ini, anda akan mempelajari cara membuat kompilasi 3D daun hidup dari foto tekstur biasa. Anda akan mampu memanipulasi objek yang anda inginkan. mari kita cuba lakukan..


Step 1
To begin, you’ll need to find a photograph texture of a leaf. I have chosen this one by a photographer named Caleb Kimbrough.


Step 2

Load your new found texture into a new project. With the Rectangular Marquee Tool (M) selected, Right-click on your layer in the artboard and select Free Transform. Once you have done that right-click on the texture again and select Warp. I have labeled each corner respectively as we will be moving them around quite a bit.


Step 3

Now that you have your layer in Warp mode, click and drag the corner (a) down 1/3 of your grid.


Step 4

Now click and drag the corner (point c) up 1/3 of your grid. Already our leaf is beginning to take on it’s natural form.


Step 5

Each corner has 2 arms that you can move in order to manipulate your layer even further. Pull the corner’s (point a) left arm down as shown below.


Step 6

You should give a sharper edge to your leaf. Something like this. Press Enter to finalize the Warp.


Step 7

You should have a sharp point on your leaf after the last several steps. However, your point may be a bit bent due to the Warp Tool curling. Fix this by using the Polygonal Laso Tool (L), selecting the excess curl and pressing the Delete key.


Step 8

Now lets focus on the other end of the leaf. Use the Warp Tool again (see Step 2) and drag point d as shown in the picture below. You’ll want to get both of the arms of point d to be parallel.


Step 9

Now do the same with the top-right corner (point b). Also, if you want you can tweak the leaf into whatever position you require by holding your mouse down and dragging the inner grid, as well as the other points.


Step 10

To add a bit of additional perspective Right-click on your leaf and select Free Transform. Now hold Alt + Shift and drag the top-right corner, then move it left a bit. This will give the leaf a bit of distance perspective.


Step 11

If you want to make the leaf drop at its point, use the Rectangular Marquee Tool (M) and select only the left half of the leaf. Then proceed to Free Transform > Warp. This will allow you to move that half of the leaf without warping the right half. Make sure not to move the points that are in contact with the leaf that is not selected as this will cause a tear between the two pieces.


Step 12

Next, duplicate the layer with your leaf on it, drag that layer below your original leaf layer. Warp it a little to show some discrepancy. Repeat this process as many times as your desire. Play with it and have fun.


Step 13

On each layer you can add a simple drop shadow by double-clicking on the layer and checking the box labelled Drop Shadow. To give leaves even more depth, make sure you adjust the Distance, Size, and Opacity accordingly. The larger leaf has an Opacity of 63%, a Distance of 299px, and a Size of 84px (this is on an artboard sized at 2590px by 1943px at 72px per inch). If you have a leaf that is directly on top of another, you will want to have the distance significantly lower, as well as the size. It should be more sharp and distinct.


Step 14

Next I added a quick and easy Bevel and Emboss. It is often frowned upon to use this but it gets the job done quick. You can paint the sunlight hitting the leaf if you desire, but this is only an intermediate tutorial.

Double-click on the desired layer and check the box Bevel and Emboss. Change your Depth to 100%, Size to 65px, and Soften to 0px. Also you may want to lower the Opacity of the Highlight Mode as well as the Shadow Mode.


Step 15

You may want to add some depth of field. To do this I recommend you use a simple Gaussian Blur. Select the leaf that is below the rest of them. Right-click on the layer in the Layer Window and select Convert to Smart Object. Now select Filter > Blur > Gaussian Blur and set it to 2.6 pixels.

A Smart Object will allow you to change the settings of your applied filters non-destructively. If you are really thoughtful, you could do this with the Drop Shadow and the Bevel and Emboss on the leaves…repeat this process with the other leaves, but lower the blur as the leaves get closer to the largest leaf. We want that to be the focus.

You can also use the paint brush to mask the Smart Filter on the Smart Object. If you select the Smart Filter on your Smart Object layer, select the color black and paint on the artboard with the Paintbrush Tool. You will find that it removes the Gaussian Blur (or any other filter you applied to your Smart Object) in the area that you paint black. I did this with the largest leaf and left only the edges slightly blurred.


Final Image

There you have it. A quick and easy display of greenery. You can really play around with this and do a lot of different types of leaves and positioning. I hope you’ve enjoyed this tutorial. Half the fun is just messing around with the Warp tool. The final image is below. You can view it larger here.

TUTORIAL : DIGITAL KOLAJ JAKET KERTAS

Share
TUTORIAL : DIGITAL KOLAJ JAKET KERTAS

Tutorial ini menunjukkan bagaimana untuk mengawal penempatan pola untuk menggabungkan gambar ke latar belakang, sebagai latar belakang. Hal ini juga menunjukkan bagaimana membuat pola yang sama ke tekstur realistik di beberapa bahagian. Mari kita lihat cara2 nya untuk melakukannya.


klik to view full image

Step 1

Download the two photos we’ll be using for this tutorial: model and torn paper. I downloaded the medium size. Now create a document 1132px by 1696px (these are the same dimensions as our model pic).

klik to view full image


Step 2

Place our texture background in the back and turn its visibility off for now. Also, place a copy of our model photo behind and hide it as well, as we will be using a destructive editing technique, so it’s good to keep a copy. We’re going to use techniques found in this video to extract the model from the background.

Select the "model layer" in the Layers palette. Then go to Filter > Extract. Grab the Highlighter Tool and outline the hair with an 80px Brush Size. Outline the rest of the model with a 10px Brush Size, zoom in when necessary. Then grab the Fill tool and Click inside the image. Then hit OK. The result is the last in the series below.

Tip: We use the Extract Filter because it gives us professional results quickly. After applying the extract, use the History Brush Tool if you need to clean up the extraction. See the video link for an example of this in action.

klik to enlarge


Step 3

Turn the "texture" layer’s visibility back on, and the background is now replaced. Notice how this texture isn’t quite long enough to fill the entire background. The lower left and right corners are not filled. We’ll need to account for this in later stages of the design process.

klik to enlarge


Step 4

Now let’s start building our Camouflage Collage Jacket. We’re going to break it into six parts. This will give us some flexibility. You could choose to break it up into more or fewer parts. I chose to use vector masks. This was chosen because we’re using a collage style. The vector masks give hard-edged cuts. It fits the style of what we are looking for. We will work from back to front. Let’s start with the left side.

Copy the "texture" layer. Then position it behind the left side of the jacket. Make sure this layer is selected. Then grab the Pen Tool (P). Make sure that Paths are selected. The Paths button is located in the top left-hand corner of Photoshop’s interface. Start drawing the shape of the left side of the jacket. Keep in mind what will go in front of this layer. This will help with deciding the path. Also, overshoot the original jacket a little, as you don’t want the original tan jacket to show in the final design.

Once you’ve drawn the mask, Ctrl-click and select Create Vector Mask. Then name the layer "left_side." Position the new layer in front of the model. Then add to the mask. Make sure the Vector Mask Thumbnail is selected. Then draw in the small patch at the bottom of the design, as shown in the last image below.

Be careful of which area you choose to use from the background, as some areas of the texture image are blurry. Those areas wouldn’t be the best to put into the jacket. Notice how we changed the jacket path to be a bit larger in the left-hand corner. This hides that area where the background ended.

klik to enlarge


Step 5

Now we will draw the left arm. Make another copy of the "texture" layer. Then position it behind the left side of the jacket. Again, draw a Vector Layer Mask, using the same process as in the previous step. Once you’ve completed, name the layer "left_arm," and move it to the front.

Tip: you may want to turn the Visibility of the "left_side" layer on and off while drawing this path. Ultimately, the "left_arm" layer should slightly overlap the "left_side" layer. Also, notice how we placed the texture in a different position than when we created the first mask. This further separates these two areas. If you prefer this to look flatter here then mask the texture in the same position as the "left_side" layer.


Step 6


Let’s draw the left jacket lapel next. Make another copy of the "texture" layer. Then position it behind the left side of the jacket lapel. Again, draw a Vector Layer Mask, using the same process. Once completed name the layer "left_lapel," and move it to the front. There are three pieces that make up the left lapel mask. The progressive process of making this mask is shown below.

klik to enlarge


Step 7

Repeat this process of creating Vector Masks for each piece of the right side of the jacket. Name the right pieces "right_side," "right_arm," and "right_lapel." Then position your textures the way you want them to look in the final design. On the right side, be sure to account for where the texture ends, and make the "right_side," layer cover up the missing texture spot.

You can unlink the mask from a layer in the Layers Palette. There is a little chain link icon that can be toggled on and off. When toggled off you can reposition the texture of the layer without moving the mask. You want to do any repositioning now, as we’ll be using the Burn Tool in the next step. This tool works directly with pixels, and therefore is irreversible. I also repositioned the background a little.

You may also want to save a copy of the document at this point as well, in case you want to return to this stage of the design. To do that go to File > Save As, and in the dialogue box check As a Copy. I named my copy "flat_masks".

klik to enlarge


Step 8

Now we want to decide which areas of our image to give volume to and which areas to keep flat. We want the camouflage to be strong in parts of the image. The strategy for this design is to have some parts look like an actual jacket, and others blend into the background as flat texture. This confusion of foreground and background adds interest to the image. We want a good mix of the two. The lapels will be the focal point. We’ll give them a full shading treatment.

We will predominantly use the Burn Tool (O) to brush in our shading. Once that tool is selected, choose a soft brush with a size between 40px and 80px. You can tap the left and right brackets ([ ] )on your keyboard to quickly increase or decrease the brush size. The options for this tool are located in the top left-hand corner of Photoshop’s Interface. Focus on the Range of Midtones mostly here, but if you want to make the Shadows or Highlights darker you could choose those Ranges as well. I also left the exposure at 50 percent. Keep in mind if you overdo it, you can grab the Dodge Tool, and lighten the image again.

Now Burn areas of the lapel with the Burn Tool. Focus on the outer edges. Turn off the texture and look at the original jacket. Take clues from the shading done to the original jacket, though feel free to differ when it makes sense. For the most part, significantly darken the inner edge of the lapel. Then darken the outer edge a little bit to create a curvature on the lapel.

The images below show the right lapel being created. Notice how we start with shading the inner shadow on the lapel. Then we move on to add some shading to the outer edge of the lapel. Overall a larger brush can be used on the inside. Then drop the brush size down a bit for the outside edge. The last image shows how the Burn Tool adds shading to the lapels. They now appear curved and are no longer flat.

klik to enlarge


Step 9

Now we will burn the "left_side," and "right_side," layers to add some emphasis to the lapels. We will also add shading in the sides. We’re going to let the left side blend into the background, but shade the right side more. The arrows in the images below show the areas shaded the most. The final image in the set below shows our results so far.

klik to enlarge


Step 10

Let’s give the sleeves some volume. We’ll be using the Burn Tool on the "left_arm," and "right_arm," layers. The arrows below indicate where most of the shading was placed.


Kesimpulan

Now that we have composed the image, go in and make any final adjustments. There is great variation that can be achieved with this type of design. It depends on how much volume you want areas to have, or if you want some areas to appear more flat. Consider using this kind of collage-style camouflage technique in one of your own designs. The final image is below.

30 Mei 2010

VECTOR : COMICS ELEMENT

Share


VECTOR : COMICS ELEMENT
Categories: Vectors » Abstract

detail...
EPS | Preview | 6.21 Mb

sedut...
tekan sini

VECTOR : CARD #1

Share


VECTOR : CARD #1
Categories : Vectors » Abstract

detail...
EPS | Preview | 5.4 Mb

sedut..
tekan sini

29 Mei 2010

PEMANDU KERETA, ANDA PERLU TAHU FAKTA INI

Share


ini situasi sangat tidak seronok


Kebanjiran kereta di sepulusuk jalan amat melemaskan. jika diimbas kembali 20 tahun lalu keadaan mustahil begini. seperkiraan saya lebuh raya sudah bepuluh diturap. sekali bikin 3 atau 4 lane wajib. ini bagi memastikan berduyun kereta masuk supaya kapasiti jalan dpenuhi kenderaan semaksima mungkin atas tujuan memenenuhi kantung pihak konsesi. Ini hukum wajib bagi penganut kapitalis. Bukan lebuhraya sahaja, bahkan jalan2 kampung juga dganti tar. semak2 dan hutan kebanyakkan telah pupus. semua telah dbersih utk dibangunkan kawasan industri, rumah, kedai bertigkat atau jalan. tapi kebanjiran kereta atau kesesakan jalan raya tetap kritikal sedangkan hutan dan semak hampir tiada.

Waktu kritikal ksesakan yang biase dtempuhi, biasanye pnduduk bndar ialah pada waktu pagi dan petang hari bekerja. kesesakan ini seperti tiada sudahnye. ksesakan ini seperti dpersetujui kbanyakan pengamalnya. kesesakan ini seperti suatu rutin bagi penganut berhaluan urban. post mortem klise, balik2 tntg kseriusan memperkasa pengangkutan awam. ini ide lapok. setiap kali bcerita bgaimana nk kurangkan ksesakan. setiap kali jugalah tambah pengangkutan awam. smbil berceramah tntang sifir jadual perjalanan pengangkutan awam akn dipercepat. ini ide sama. idea yg dikitar setiap kali dberi peluang berucap depan kamera.

Rumus penyelesaian sebenarnye seperti mudah. mungkin sukar. mugkin mudah tapi sukar. mungkin sukar tapi mudah. sebab itulah jalan tetap sesak. terlalu banyak layan kemungkinan. kite cube kembali kepada konsep kitaran hidup manusia. kita akan dapat lihat sisi yang terlepas dari pendangan pengilang kenderaan. kita akan cube mamahami rumus tuhan, dimana setiap bende hidup pasti akan mati. dimana setiap hari pasti ada manusia yang akan lahir dan ada manusia yang akan mati. walaupun populasi manusia semakin menambah tapi ia sesuatu yg pasti perlu melalui proses. yang hidup pasti akan mati. yang lama pasti akan berganti baru. itu rumus tuhan....

Tetapi didalam kamus taikun kereta. rumus tuhan bukan sesuatu yang sesuai untuk dipraktikkan dalam urus niaga kereta. ia sesuatu yang tidak memberi keuntungan. jadi sudah pasti bukan sesuatu yang harus diutamakn. perlukah satu penggarisan akta berkaitan pengeluaran dan pelupusan kenderaan wujud bagi mengawal kebanjiran kenderaan di jalan raya? ia tentu sesuatu yang tidak menggembirakan banyak pihak. bayangkan akta dimana setiap kenderaan yang akan dijual mesti digantikan dengan kenderaan yang ingin dilupuskan. manakan manusia mengalami pertambahan populasi sedangkan kenderaan tidak bertambah. logiknye kenderaan mesti bertambah juga. sebenarnye idea ini tidak menyokong semarak kesuburan perniagaan, mahupun kepentingan pengguna.


berselisih ajal, atau bertemu ajal

Nyatalah situasi ini bukan mudah. susuk mana yang mahu tampil untuk menyerap kelemasan sebilangan besar penempuh sesak tegar? batang tubuh mana yang sanggup bekorban untuk keselesaan pemandu menghadapi hari sukar dan penuh tekanan kerna kesesakan? sebenarnya kumpulan penyumbang sesak sifar telah lama wujud. penyumbang sesak sifar yang dmaksudkan ialah penunggang motosikal. walaupn nampak lekeh, kepentingan mereka seharusnye diambil berat. kepentingan mereka seharusnya paling utama. kerana sumbangan mereka besar. kesanggupan mereka menunggang motosikal menjadikan kondisi trafik lebih lancar. dan itu adalah satu sumbangan besar dalam proses pengurangan kesesakan…

Walaupun wujudnya mereka setiap hari diatas turapan jalan hanya diperlekeh si pemandu kereta. malah wujud klasifikasi rempit tidak beradab dibenak sesetengah pemandu kereta. tetapi percayalah. pengukuhan kepentingan, kemudahan & fasiliti penunggang motosikal pasti akan memberikan keputusan yang baik untuk kelancaran sistem trafik Negara. masalah kesesakan jalan raya setiap kali pergi dan balik kerja pasti tidak mencakupi perenggan gelap diari harian pemandu kereta lagi.

Jadi dalami, fahami & amati perenggan terakhir ini. Dimana setiap pemandu perlu tahu. Disebabkan oleh kerana kamu wahai si pemandu tidak tahu menunggang motor, takut, tidak mahu mengharungi hujan, bahaya atau tidak selesa. masanya telah tiba untuk memberikan penghormatan ter-tinggi untuk mereka si penunggang motosikal. lenyapkan ego kamu untuk mengerti bahwa kelas penunggang motosikal lebih mulia dari kamu si pemandu apabila di jalanan. Bahwasanya kesanggupan golongan ini menunggang mengharungi bahaya, hujan, & ketidakselesaan adalah satu pengorbanan yang maha mulia…

TEXTURES : STRIPED MATS

Share


Striped mats textures
Categories: Images » Textures

detail...
Striped mats textures
5 JPG Files | 3264 x 2448 | 180 dpi | 36.4 Mb

bila terase mahu..
tekanlah di sini..
la la la la

TEXTURES : AUTUMN WHISPER

Share


Textures : Autumn Whisper
Categories: Images » Textures

Detail
10 JPEG | 3400х4500 | 300 dpi | 46,2 Mb

nk buat stok... ??
tekanan sini

28 Mei 2010

TEXTURE : ASPHALT

Share


Textures Asphalt
Categories: Images » Backgrounds Textures

detail......
5 JPEG | 3000x2008 | 40 Mb


ingin memiliki?
gesek sini

TEXTURE : FLOWER

Share


Textures : Flower
Categories : Images » Textures

detail....
32 JPEG | 3000x2008 | 105 Mb

mauk?
tekan je

26 Mei 2010

TEXTURE : FLORAL

Share


texture : floral
Categories: RF Images » Textures RF Images

Detail
10 JPEG | ~ up to 3600х2600 | 51,9 Mb

nak.....?
klik sini

FARID KAMIL TERIMA IJAZAH SARJANA MUDA UITM

Share


bagus, terus belajar.


SHAH ALAM - Pengarah muda dan pelakon popular, Farid Kamil Zahari semalam menerima Ijazah Sarjana Muda Teknologi Kreatif (Seni Layar) pada istiadat Konvokesyen Universiti Teknologi Mara (UiTM) ke-72 di Dewan Sri Budiman, di sini.

Farid, 29, yang hadir ditemani bapanya, Datuk Dr. Zahari Che Dan, 58, dan ibu, Datin Sharifah Bardah Syed Abdillah, 55, tersenyum bangga apabila segala usaha selama empat tahun mengejar ilmu sambil bekerja membuahkan hasil.

Dia yang juga menamatkan pengajian Seni Lakon Teater peringkat diploma di universiti yang sama bersyukur apabila berjaya mencapai cita-cita untuk mengarahkan satu filem sebelum bergelar graduan.

"Saya rasa bertuah kerana cita-cita itu tercapai apabila filem pertama arahan saya, V3 Samseng Jalanan menemui penonton sebelum majlis konvokesyen ini.

"Seterusnya, saya akan menemui penonton dengan filem terbaru lakonan saya, Lagenda Budak Setan sebelum kembali mengarah filem kedua bertajuk Kongsi hujung bulan ini," katanya.

...................................

nak jadi pelakon, penyanyi boleh
tapi jangan jadi pelakon, penyanyi yang benak

nak jadi popular boleh
tapi jangan nak harap jadi idola utk orang lain

susuk yang mahu popular
bukan jenis idola

tapi kalau nak jugak jadi pelakon, penyanyi
jadi lah jenis yang pandai

Salut

ini baru betul artis *beethoven


ini artis yg menjadi *tchaikovsky


ini artis aku sgt suka *Abdullah Hussain


ini bukan artis, ini idola
*Muhammad Yusof Ahmad - Tok Kenali

KRISIS GULA BERLARUTAN

Share
SEREMBAN - Krisis bekalan gula yang melanda beberapa negeri di Pantai Timur kini merebak di Negeri Sembilan apabila beberapa pasar raya dan kedai runcit di beberapa buah daerah di sini mendakwa kehabisan bekalan.

Tinjauan Kosmo! di beberapa buah pasar raya dan kedai runcit di sekitar bandar ini mendapati kebanyakan rak gula didapati kosong.

Beberapa peniaga yang ditemui pula memberitahu, bekalan gula sudah terputus sejak tiga hari lalu menyebabkan stok semakin berkurangan.

Malah, terdapat beberapa peniaga yang masih mempunyai sedikit simpanan terpaksa mengehadkan pembelian kepada satu kilogram gula untuk setiap seorang pelanggan.

Difahamkam, beberapa daerah di negeri ini termasuk Jempol dan Rembau turut berhadapan dengan situasi sama.

...............

Alternatif, pakai gule semut


MEMAHAMI KENAPE ADA MASALAH PASAL BEKALAN GULA NI

NAK PROSES GULE SENDIRI LA

NAK BUAT LOAN BUAT BELI TANAH LADANG
TANAM TEBU, BELI MESIN, PROSES BUAT GULA

JUAL MURAH JE
NAK SOROK-SOROK TAK MAIN LA
ORANG NAK BELI SATU AKU OFFER DUA

TAPI MASALAHNYE TAK BOLEH
ORG BIASA TAK BOLEH BUAT
, TAPI 'RAJA GULE' BOLEH

PERMAINAN PUN BERMULA
MULA DENGAN MAEN SOROK-SOROK
PASTU MAEN NAIK-NAIK HARGA
PASTU MAEN KONDA-KONDI.. HAHAHA

DIA BOLE BUAT APA DIE SUKE
JANJI DIE LAGI KAYA DARI SUME MANUSIA


TUTORIAL : EFFEK CAHAYA MATAHARI MELALUI AWAN

Share
Dalam tutorial ini saya akan menunjukkan kepada anda bagaimana mengubah hari mendung ke adegan dramatik memukau dengan sinar matahari melanggar melalui awan. Teknik ini boleh digunakan untuk aplikasi lain. Mari kita mulai ...


Before & After:

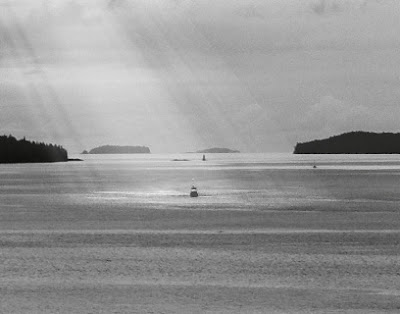
Here’s the photo we’re working with

klik for enlarge pic


And here’s what we’re producing (Click the image for a larger version)


klik for enlarge pic


Step One:

Duplicate the Background photo layer by dragging it to the New Layer Icon at the bottom of the layers palette. Name it ‘Light Beam Base’.

With that layer selected hit CMD + M (or CTRL+M on PC) to apply a curve to it. Apply a harsh curve to it so that we have maximum contrast in the clouds with small areas that go completely white. I am focusing on the area on the top third of the frame slightly to the left. These white areas are going to be where our beams of light come out of the clouds.


Now apply a 2 pixel gaussian blur to that layer (Filter > Blur > Gaussian Blur).


Step Two:

Turn off the Light Beam Base layer and select the Background layer. Select the Polygonal Lasso tool (L). Set the Feather to 50 in the Properties bar at the top of the screen.


Draw a loose selection around the area of the sky where the beams will come from by clicking various points. Here is the selection I made as viewed in Quick Mask mode:


Make a new Curves Adjustment Layer just above he Background layer. Our selection is automatically applied as a layer mask. Apply a similar curve to the one we did before, but this time we want to limit it so the shadow areas are not affected. Name the layer ‘Light Source’.


Step Three:

Turn on and select the Light Beam Base layer. In the toolbar select the Single Row Marquee tool. Zoom in on one of the white areas of the clouds and click once in the middle of it. This selects a single row of pixels across the image.


Zoom out so you can see the whole image. Select the regular Marquee tool. While holding alt/option drag from the left of the image right up to the left side of the white area to deselect those pixels. Do the same on the right side. You shoud end up with a selection of a single row of pixels just across the white area like so:


With the ‘Light Beam Base’ layer selected hit CMD + J. This throws your selected pixels on a new layer. Name that layer ‘Beam 1′.


Step Four:

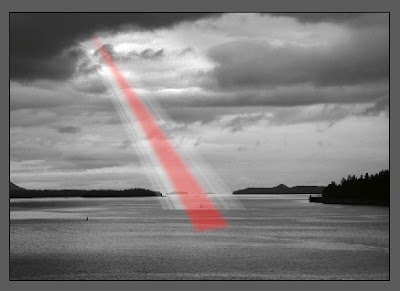
Turn off the ‘Light Beam Base’ layer. Select the ‘Beam 1′ layer. Hit CMD+T to Free Transform the layer. Grab the bottom center handle and stretch is all the way down to about where the boat sits. Now while holding CMD drag the same handle to the right so it sits just under the boat. Now while holding CMD+SHIFT drag the bottom left and right handles outward until you get a shape that you like.


Note that the Free Transform preview might look a little whacked because Photoshop is dealing with a single row of pixels. This technique is called pixel stretching. When you apply the transform it will look right.


Step Five:

Set the ‘Beam 1′ layer’s blending mode to Screen on the layer palette.

Hit CMD+M to apply a curve to the layer. Darken the layer way down until the beams of light start to show up.


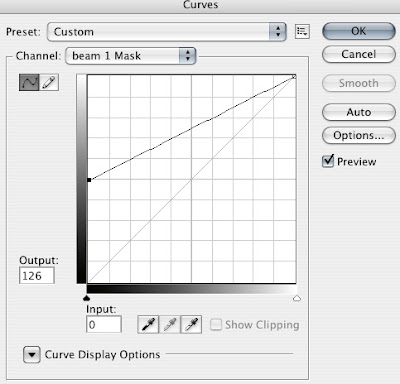
Add a layer mask by clicking on the Add Layer Mask button at the bottom of the layer palette. Select the mask by clicking on it in the layer palette then hit CMD+M to apply a curve to it. Bring the highlight point down to 50%. Hit OK.


Select the Polygonal Lasso tool (L) and set the Feather to 15 this time. Select the center of the beam all the way through. Here is what my selection looked like as a quickmask.


Select the ‘Beam 1′ mask and hit CMD+M to apply a curve. This time bring the shadow point up to 50%. This will make the center of the beam brighter than the edges.


Step Six:

With the mask still selected, hit G for the Gradient tool. Click on the gradient preview in the top left of the screen and set it to the black to white gradient if it isnt already set. Set the gradient mode to Multiply on the Properties Bar.

Drag from the top of the beam to the bottom. Before you click anything else go to Edit > Fade Gradient. Fade it down to about 50%. This creates a falloff on the beam but we use the Fade function so it doesn’t completely disappear at the bottom.


Step Seven:

Select the Background layer. Select the Eliptical Marquee tool. Click and drag directly on the boat, while holding down the mouse button hold ALT and make a narrow ellipse at the base of the beam.

Hit Q to enter Quick Mask mode. Go Filter > Blur > Gaussian Blur and use 5 as the radius. Go Filter > Blur > Motion Blur and make the angle 0 and the distance 150. Hit Q to exit Quick Mask.


Make a curves adjustment layer just above the Background layer. Lighten up the water a bit until it looks like the beam is hitting the water.


Step Eight:

I just want to add a little contrast to the image as a whole. To do that, put a curve at the top of the layers palette and just add some contrast.


Repeat steps 3 through 7 as many times as you would like using other white spots in the clouds but be sure to mind the angles at which the beams come down. They should look like they all come from the same light source. I did 3 different beams to create my image.

Related Posts Plugin for WordPress, Blogger...