1 Jun 2010

WALLPAPER : COLLECTION #1

Share


wallpaper : #1
Categories: Wallpaper

detail...
40 images | JPG | 18.2 MB RAR

sedut...
klik mari

ILLUSTRATIONS : by DAVID WATERS

Share


Illustrations by David Waters
Categories: Stock Images CD's

detail...
11 Pics | JPG | From 1098x1700 to 2266x1700 | 7 MB

sedut...
tekan sini

ADVERT : CREATIVE ADVERTISING

Share


ADVERT : Creative advertising
Categories: AD Works

detail....
38 jpg | 16 mb

rase macam ilham dah kering..
nah ambik ads ni buat top up ilham
biar ilham terpercik-percik keluar
jangan biar potensi habis..

sedut...
klik sini

ARTIKEL UNTUK PENGGEMAR AYAM PASARAYA

Share
Jual ayam tak halal, Tesco disaman RM1.6 juta


Seorang peniaga dan empat anggota keluarganya hari ini memfailkan saman ganti rugi RM1.6 juta terhadap Tesco Stores (M) Sdn Bhd kerana didakwa cuai memastikan produk ayam segar yang siap diproses dan dilabelkan halal, benar-benar halal megikut agama Islam.

Saman itu difailkan oleh Raja Muzaffar Kamar Raja Busu, Lijah Awang Kechik, Raja Kamar Idris Raja Busu, Norhayati Abdullah dan Raja Teh Rahmah Raja Busu.

Writ saman itu difailkan oleh peguam Kamal Razali melalui firma guaman, Badruzzaman & Kamal, Peguambela & Peguamcara, Peguam Syariah di Pejabat Pendaftar Mahkamah Tinggi, di Pulau Pinang.

Dalam pernyataan tuntutannya, Raja Muzaffar Kamar yang mewakili empat plaintif lain dari Bayan Baru, memohon ganti rugi am RM1 juta, ganti rugi teladan RM500,000 dan ganti rugi teruk RM100,000.

Beliau turut menuntut surat permohonan maaf secara terbuka oleh defendan kepada semua plaintif kerana mengalami trauma dan maruah plaintif tercalar kerana menjual ayam haram.

Raja Muzaffar Kamar berkata beliau mengalami trauma dan berasa berdosa kerana memakan ayam yang haram bersama plaintif lain dan memberi makan produk ayam yang haram kepada pelanggan di restoran miliknya di Astaka Gelugor, di Pulau Pinang.

Katanya pada 12 Mac lalu, beliau membeli tiga ekor ayam yang siap disembelih dan dipek dengan bungkusan berjenama HyFresh tertera logo halal dikeluarkan Jabatan Kemajuan Islam Malaysia (JAKIM).

Raja Muzaffar Kamar berkata beliau memasak ayam itu dan sebahagiannya dimakan bersama keluarganya manakala bakinya dijual di premis perniagaannya.

Beliau berkata ketika membuang sisa ayam itu mereka mendapati kesan sembelihan pada leher ayam berkenaan mencurigakan kehalalannya di sisi Islam dan membuat laporan kepada Jabatan Hal Ehwal Agama Islam Pulau Pinang (JHEAIPP).

"Pada 16 Mac lepas, JHEAIPP kemudian membuat siasatan dan merampas ayam berjenama HyFresh di pasar raya itu kerana tidak disembelih mengikut kaedah ditetapkan Islam," katanya.

Katanya pada 31 Mac lalu, Jabatan Mufti Pulau Pinang mengeluarkan surat mengesahkan produk ayam berkenaan tidak disembelih mengikut ketetapan syariat Islam dan haram dimakan oleh orang Islam.

- Bernama

Dipaksa minum jus stoking - kosmo

Share


CINTA IBU ADALAH CINTA YANG AGUNG

remuk hati seorang ibu, menyirami pusara anak yang
belum sempat meluahkan rasa cinta kepada ibunya sebelum pergi


KUALA LUMPUR - Selepas empat hari bertarung nyawa di Unit Rawatan Rapi (ICU) Hospital Tengku Ampuan Rahimah (HTAR) Klang, seorang pelatih Pegawai Tadbir dan Diplomatik (PTD) akhirnya meninggal dunia semalam.

Nor Hashimah Wahid, 30, disahkan meninggal dunia pukul 6.35 pagi akibat jangkitan paru-paru ketika sedang menjalani latihan Modul Jati Diri di Kem Latihan Jugra, Banting anjuran Institut Tadbiran Awam Negara (Intan) sejak 23 Mei lalu.

Difahamkan, Nor Hashimah yang bertugas di Kementerian Kewangan, Putrajaya dipaksa menjalani latihan lasak di situ walaupun pernah mengadu tidak sihat.

Seseorang pelatih PTD wajib mengikuti latihan tersebut selama tujuh bulan yang merupakan antara syarat untuk pengesahan jawatan.

Seorang rakan mangsa yang enggan dikenali memberitahu, mangsa pernah mengadu tidak sihat ketika latihan masuk hari kedua tetapi dia disahkan hanya mengalami demam biasa selepas mendapatkan rawatan di klinik berdekatan.

"Keadaan bertambah buruk apabila kami semua dipaksa menjalani latihan fizikal yang keras termasuk berkayak selama empat jam, berendam dalam kolam berlumpur dan minum air jus stoking," katanya ketika ditemui semalam.

Tambahnya, ekoran latihan lasak itu, Nor Hashimah semakin tenat apabila mukanya kelihatan pucat dan bibir kebiru-biruan sebelum dihantar ke HTAR Jumaat lalu.

Sementara itu, abang ipar mangsa, Zakir Hussain, 41, memberitahu, mereka sekeluarga amat kesal dengan tindakan pihak pengurusan program latihan yang langsung tidak memberitahu mereka mengenai kesihatan Nor Hashimah.

"Pelatih tidak dibenarkan menggunakan telefon dan masa arwah demam pun mereka tidak beritahu kami. Suami arwah hanya dihubungi selepas dia dimasukkan ke ICU," katanya.

Dalam pada itu, ibu mangsa, Norlia Hashim, 61, memberitahu, dia mendapati ada kesan luka dan lebam pada tubuh anak bongsunya itu ketika memandikan jenazah

"Bagaimanapun, saya tidak tahu apakah punca kesan lebam dan luka itu," katanya.


CATITAN
.......................................

ini cerita duka lara manusia
cerita tentang duka sebelum pergi
cerita tentang remuk hati seorang ibu


biarlah ibu yang mendoakan kamu


"apakah kesakitan ibu melahirkan kamu
adalah untuk melihat kamu pergi dulu dari ibu

apakah salah dan dosamu sehingga sampai nafas terakhir
sehingga hujung dasar nyawa baru lahir belas kasihan

ibu masih mahu mendengar suaramu, masih mahu tahu
apa mahu mu, masih mahu tahu apa kehendakmu,

sesungguhnya jika ibu tahu kamu akan pergi dahulu, segala permintaan
terakhirmu adalah pemberian maha bermakna sepanjang hidup ibumu ini"


tetapi aku percaye ibumu ini pasti redha qada' dan qadar tuhan..
aku percaye hikmah yg hebat akan menemani ibumu sekeluarga selagi
ibumu ini bernadi & bernafas...... doaku


adakah manusia kini sudah buta?
adakah manusia kini tidak tahu tipu atau benar?
adakah manusia kini telah gelap hatinya?
adakah manusia kini sudah hilang naluri kemanusiaannya?

aku lebih takut untuk mempercayai bahwa manusia sudah tiada kemanusiaan.
ini adalah petunjuk kita ke hujung penjuru zaman
ini adalah petunjuk tentang betapa dekatnye zaman lenyap khalifah manusia

31 Mei 2010

ILLUSTRATIONS : by ALEXIA SINCLAIR

Share


Illustrations : by Alexia Sinclair
Categories: Art Images » Illustrations

detail....
54 JPG | 430x667 - 1500x667 | 7.27 Мb

nak framekan artwork2 tersebut...
nah, ambil...

PAINTING : by MARTIN DESCHAMBAULT

Share


PAINTING : MARTIN DESCHAMBAULT

Art by Martin Deschambault
Categories: Art Images » Paintings

detail...
98 JPG | 1200X600 | 25 mb

rase mcm nk buat koleksi...
tekan, jgn segan

TUTORIAL : MEMBUAT DAUN 3D DARI FOTO TEKSTUR

Share
TUTORIAL : MEMBUAT DAUN 3D DARI FOTO TEKSTUR

Di dalam edisi totorial beginner ini, anda akan mempelajari cara membuat kompilasi 3D daun hidup dari foto tekstur biasa. Anda akan mampu memanipulasi objek yang anda inginkan. mari kita cuba lakukan..


Step 1
To begin, you’ll need to find a photograph texture of a leaf. I have chosen this one by a photographer named Caleb Kimbrough.


Step 2

Load your new found texture into a new project. With the Rectangular Marquee Tool (M) selected, Right-click on your layer in the artboard and select Free Transform. Once you have done that right-click on the texture again and select Warp. I have labeled each corner respectively as we will be moving them around quite a bit.


Step 3

Now that you have your layer in Warp mode, click and drag the corner (a) down 1/3 of your grid.


Step 4

Now click and drag the corner (point c) up 1/3 of your grid. Already our leaf is beginning to take on it’s natural form.


Step 5

Each corner has 2 arms that you can move in order to manipulate your layer even further. Pull the corner’s (point a) left arm down as shown below.


Step 6

You should give a sharper edge to your leaf. Something like this. Press Enter to finalize the Warp.


Step 7

You should have a sharp point on your leaf after the last several steps. However, your point may be a bit bent due to the Warp Tool curling. Fix this by using the Polygonal Laso Tool (L), selecting the excess curl and pressing the Delete key.


Step 8

Now lets focus on the other end of the leaf. Use the Warp Tool again (see Step 2) and drag point d as shown in the picture below. You’ll want to get both of the arms of point d to be parallel.


Step 9

Now do the same with the top-right corner (point b). Also, if you want you can tweak the leaf into whatever position you require by holding your mouse down and dragging the inner grid, as well as the other points.


Step 10

To add a bit of additional perspective Right-click on your leaf and select Free Transform. Now hold Alt + Shift and drag the top-right corner, then move it left a bit. This will give the leaf a bit of distance perspective.


Step 11

If you want to make the leaf drop at its point, use the Rectangular Marquee Tool (M) and select only the left half of the leaf. Then proceed to Free Transform > Warp. This will allow you to move that half of the leaf without warping the right half. Make sure not to move the points that are in contact with the leaf that is not selected as this will cause a tear between the two pieces.


Step 12

Next, duplicate the layer with your leaf on it, drag that layer below your original leaf layer. Warp it a little to show some discrepancy. Repeat this process as many times as your desire. Play with it and have fun.


Step 13

On each layer you can add a simple drop shadow by double-clicking on the layer and checking the box labelled Drop Shadow. To give leaves even more depth, make sure you adjust the Distance, Size, and Opacity accordingly. The larger leaf has an Opacity of 63%, a Distance of 299px, and a Size of 84px (this is on an artboard sized at 2590px by 1943px at 72px per inch). If you have a leaf that is directly on top of another, you will want to have the distance significantly lower, as well as the size. It should be more sharp and distinct.


Step 14

Next I added a quick and easy Bevel and Emboss. It is often frowned upon to use this but it gets the job done quick. You can paint the sunlight hitting the leaf if you desire, but this is only an intermediate tutorial.

Double-click on the desired layer and check the box Bevel and Emboss. Change your Depth to 100%, Size to 65px, and Soften to 0px. Also you may want to lower the Opacity of the Highlight Mode as well as the Shadow Mode.


Step 15

You may want to add some depth of field. To do this I recommend you use a simple Gaussian Blur. Select the leaf that is below the rest of them. Right-click on the layer in the Layer Window and select Convert to Smart Object. Now select Filter > Blur > Gaussian Blur and set it to 2.6 pixels.

A Smart Object will allow you to change the settings of your applied filters non-destructively. If you are really thoughtful, you could do this with the Drop Shadow and the Bevel and Emboss on the leaves…repeat this process with the other leaves, but lower the blur as the leaves get closer to the largest leaf. We want that to be the focus.

You can also use the paint brush to mask the Smart Filter on the Smart Object. If you select the Smart Filter on your Smart Object layer, select the color black and paint on the artboard with the Paintbrush Tool. You will find that it removes the Gaussian Blur (or any other filter you applied to your Smart Object) in the area that you paint black. I did this with the largest leaf and left only the edges slightly blurred.


Final Image

There you have it. A quick and easy display of greenery. You can really play around with this and do a lot of different types of leaves and positioning. I hope you’ve enjoyed this tutorial. Half the fun is just messing around with the Warp tool. The final image is below. You can view it larger here.

TUTORIAL : DIGITAL KOLAJ JAKET KERTAS

Share
TUTORIAL : DIGITAL KOLAJ JAKET KERTAS

Tutorial ini menunjukkan bagaimana untuk mengawal penempatan pola untuk menggabungkan gambar ke latar belakang, sebagai latar belakang. Hal ini juga menunjukkan bagaimana membuat pola yang sama ke tekstur realistik di beberapa bahagian. Mari kita lihat cara2 nya untuk melakukannya.


klik to view full image

Step 1

Download the two photos we’ll be using for this tutorial: model and torn paper. I downloaded the medium size. Now create a document 1132px by 1696px (these are the same dimensions as our model pic).

klik to view full image


Step 2

Place our texture background in the back and turn its visibility off for now. Also, place a copy of our model photo behind and hide it as well, as we will be using a destructive editing technique, so it’s good to keep a copy. We’re going to use techniques found in this video to extract the model from the background.

Select the "model layer" in the Layers palette. Then go to Filter > Extract. Grab the Highlighter Tool and outline the hair with an 80px Brush Size. Outline the rest of the model with a 10px Brush Size, zoom in when necessary. Then grab the Fill tool and Click inside the image. Then hit OK. The result is the last in the series below.

Tip: We use the Extract Filter because it gives us professional results quickly. After applying the extract, use the History Brush Tool if you need to clean up the extraction. See the video link for an example of this in action.

klik to enlarge


Step 3

Turn the "texture" layer’s visibility back on, and the background is now replaced. Notice how this texture isn’t quite long enough to fill the entire background. The lower left and right corners are not filled. We’ll need to account for this in later stages of the design process.

klik to enlarge


Step 4

Now let’s start building our Camouflage Collage Jacket. We’re going to break it into six parts. This will give us some flexibility. You could choose to break it up into more or fewer parts. I chose to use vector masks. This was chosen because we’re using a collage style. The vector masks give hard-edged cuts. It fits the style of what we are looking for. We will work from back to front. Let’s start with the left side.

Copy the "texture" layer. Then position it behind the left side of the jacket. Make sure this layer is selected. Then grab the Pen Tool (P). Make sure that Paths are selected. The Paths button is located in the top left-hand corner of Photoshop’s interface. Start drawing the shape of the left side of the jacket. Keep in mind what will go in front of this layer. This will help with deciding the path. Also, overshoot the original jacket a little, as you don’t want the original tan jacket to show in the final design.

Once you’ve drawn the mask, Ctrl-click and select Create Vector Mask. Then name the layer "left_side." Position the new layer in front of the model. Then add to the mask. Make sure the Vector Mask Thumbnail is selected. Then draw in the small patch at the bottom of the design, as shown in the last image below.

Be careful of which area you choose to use from the background, as some areas of the texture image are blurry. Those areas wouldn’t be the best to put into the jacket. Notice how we changed the jacket path to be a bit larger in the left-hand corner. This hides that area where the background ended.

klik to enlarge


Step 5

Now we will draw the left arm. Make another copy of the "texture" layer. Then position it behind the left side of the jacket. Again, draw a Vector Layer Mask, using the same process as in the previous step. Once you’ve completed, name the layer "left_arm," and move it to the front.

Tip: you may want to turn the Visibility of the "left_side" layer on and off while drawing this path. Ultimately, the "left_arm" layer should slightly overlap the "left_side" layer. Also, notice how we placed the texture in a different position than when we created the first mask. This further separates these two areas. If you prefer this to look flatter here then mask the texture in the same position as the "left_side" layer.
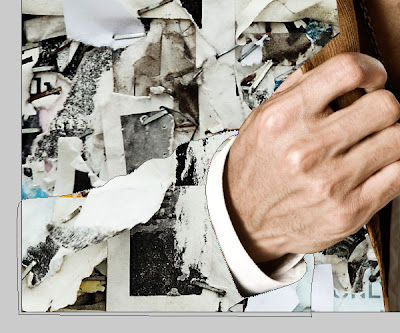


Step 6


Let’s draw the left jacket lapel next. Make another copy of the "texture" layer. Then position it behind the left side of the jacket lapel. Again, draw a Vector Layer Mask, using the same process. Once completed name the layer "left_lapel," and move it to the front. There are three pieces that make up the left lapel mask. The progressive process of making this mask is shown below.

klik to enlarge


Step 7

Repeat this process of creating Vector Masks for each piece of the right side of the jacket. Name the right pieces "right_side," "right_arm," and "right_lapel." Then position your textures the way you want them to look in the final design. On the right side, be sure to account for where the texture ends, and make the "right_side," layer cover up the missing texture spot.

You can unlink the mask from a layer in the Layers Palette. There is a little chain link icon that can be toggled on and off. When toggled off you can reposition the texture of the layer without moving the mask. You want to do any repositioning now, as we’ll be using the Burn Tool in the next step. This tool works directly with pixels, and therefore is irreversible. I also repositioned the background a little.

You may also want to save a copy of the document at this point as well, in case you want to return to this stage of the design. To do that go to File > Save As, and in the dialogue box check As a Copy. I named my copy "flat_masks".

klik to enlarge


Step 8

Now we want to decide which areas of our image to give volume to and which areas to keep flat. We want the camouflage to be strong in parts of the image. The strategy for this design is to have some parts look like an actual jacket, and others blend into the background as flat texture. This confusion of foreground and background adds interest to the image. We want a good mix of the two. The lapels will be the focal point. We’ll give them a full shading treatment.

We will predominantly use the Burn Tool (O) to brush in our shading. Once that tool is selected, choose a soft brush with a size between 40px and 80px. You can tap the left and right brackets ([ ] )on your keyboard to quickly increase or decrease the brush size. The options for this tool are located in the top left-hand corner of Photoshop’s Interface. Focus on the Range of Midtones mostly here, but if you want to make the Shadows or Highlights darker you could choose those Ranges as well. I also left the exposure at 50 percent. Keep in mind if you overdo it, you can grab the Dodge Tool, and lighten the image again.

Now Burn areas of the lapel with the Burn Tool. Focus on the outer edges. Turn off the texture and look at the original jacket. Take clues from the shading done to the original jacket, though feel free to differ when it makes sense. For the most part, significantly darken the inner edge of the lapel. Then darken the outer edge a little bit to create a curvature on the lapel.

The images below show the right lapel being created. Notice how we start with shading the inner shadow on the lapel. Then we move on to add some shading to the outer edge of the lapel. Overall a larger brush can be used on the inside. Then drop the brush size down a bit for the outside edge. The last image shows how the Burn Tool adds shading to the lapels. They now appear curved and are no longer flat.

klik to enlarge


Step 9

Now we will burn the "left_side," and "right_side," layers to add some emphasis to the lapels. We will also add shading in the sides. We’re going to let the left side blend into the background, but shade the right side more. The arrows in the images below show the areas shaded the most. The final image in the set below shows our results so far.

klik to enlarge


Step 10

Let’s give the sleeves some volume. We’ll be using the Burn Tool on the "left_arm," and "right_arm," layers. The arrows below indicate where most of the shading was placed.
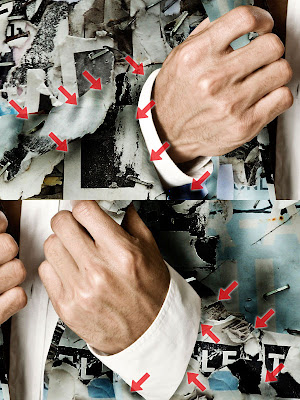


Kesimpulan

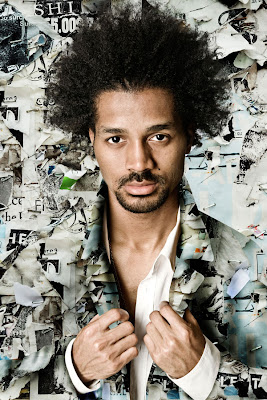
Now that we have composed the image, go in and make any final adjustments. There is great variation that can be achieved with this type of design. It depends on how much volume you want areas to have, or if you want some areas to appear more flat. Consider using this kind of collage-style camouflage technique in one of your own designs. The final image is below.
Related Posts Plugin for WordPress, Blogger...