26 Mei 2010

TEXTURE : FLORAL

Share


texture : floral
Categories: RF Images » Textures RF Images

Detail
10 JPEG | ~ up to 3600х2600 | 51,9 Mb

nak.....?
klik sini

FARID KAMIL TERIMA IJAZAH SARJANA MUDA UITM

Share


bagus, terus belajar.


SHAH ALAM - Pengarah muda dan pelakon popular, Farid Kamil Zahari semalam menerima Ijazah Sarjana Muda Teknologi Kreatif (Seni Layar) pada istiadat Konvokesyen Universiti Teknologi Mara (UiTM) ke-72 di Dewan Sri Budiman, di sini.

Farid, 29, yang hadir ditemani bapanya, Datuk Dr. Zahari Che Dan, 58, dan ibu, Datin Sharifah Bardah Syed Abdillah, 55, tersenyum bangga apabila segala usaha selama empat tahun mengejar ilmu sambil bekerja membuahkan hasil.

Dia yang juga menamatkan pengajian Seni Lakon Teater peringkat diploma di universiti yang sama bersyukur apabila berjaya mencapai cita-cita untuk mengarahkan satu filem sebelum bergelar graduan.

"Saya rasa bertuah kerana cita-cita itu tercapai apabila filem pertama arahan saya, V3 Samseng Jalanan menemui penonton sebelum majlis konvokesyen ini.

"Seterusnya, saya akan menemui penonton dengan filem terbaru lakonan saya, Lagenda Budak Setan sebelum kembali mengarah filem kedua bertajuk Kongsi hujung bulan ini," katanya.

...................................

nak jadi pelakon, penyanyi boleh
tapi jangan jadi pelakon, penyanyi yang benak

nak jadi popular boleh
tapi jangan nak harap jadi idola utk orang lain

susuk yang mahu popular
bukan jenis idola

tapi kalau nak jugak jadi pelakon, penyanyi
jadi lah jenis yang pandai

Salut

ini baru betul artis *beethoven


ini artis yg menjadi *tchaikovsky


ini artis aku sgt suka *Abdullah Hussain


ini bukan artis, ini idola
*Muhammad Yusof Ahmad - Tok Kenali

KRISIS GULA BERLARUTAN

Share
SEREMBAN - Krisis bekalan gula yang melanda beberapa negeri di Pantai Timur kini merebak di Negeri Sembilan apabila beberapa pasar raya dan kedai runcit di beberapa buah daerah di sini mendakwa kehabisan bekalan.

Tinjauan Kosmo! di beberapa buah pasar raya dan kedai runcit di sekitar bandar ini mendapati kebanyakan rak gula didapati kosong.

Beberapa peniaga yang ditemui pula memberitahu, bekalan gula sudah terputus sejak tiga hari lalu menyebabkan stok semakin berkurangan.

Malah, terdapat beberapa peniaga yang masih mempunyai sedikit simpanan terpaksa mengehadkan pembelian kepada satu kilogram gula untuk setiap seorang pelanggan.

Difahamkam, beberapa daerah di negeri ini termasuk Jempol dan Rembau turut berhadapan dengan situasi sama.

...............

Alternatif, pakai gule semut


MEMAHAMI KENAPE ADA MASALAH PASAL BEKALAN GULA NI

NAK PROSES GULE SENDIRI LA

NAK BUAT LOAN BUAT BELI TANAH LADANG
TANAM TEBU, BELI MESIN, PROSES BUAT GULA

JUAL MURAH JE
NAK SOROK-SOROK TAK MAIN LA
ORANG NAK BELI SATU AKU OFFER DUA

TAPI MASALAHNYE TAK BOLEH
ORG BIASA TAK BOLEH BUAT
, TAPI 'RAJA GULE' BOLEH

PERMAINAN PUN BERMULA
MULA DENGAN MAEN SOROK-SOROK
PASTU MAEN NAIK-NAIK HARGA
PASTU MAEN KONDA-KONDI.. HAHAHA

DIA BOLE BUAT APA DIE SUKE
JANJI DIE LAGI KAYA DARI SUME MANUSIA


TUTORIAL : EFFEK CAHAYA MATAHARI MELALUI AWAN

Share
Dalam tutorial ini saya akan menunjukkan kepada anda bagaimana mengubah hari mendung ke adegan dramatik memukau dengan sinar matahari melanggar melalui awan. Teknik ini boleh digunakan untuk aplikasi lain. Mari kita mulai ...


Before & After:

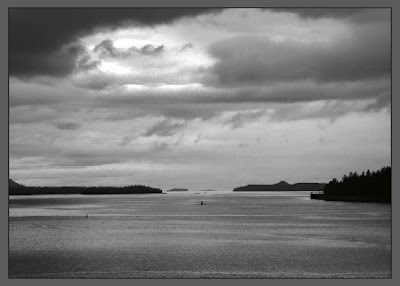
Here’s the photo we’re working with

klik for enlarge pic


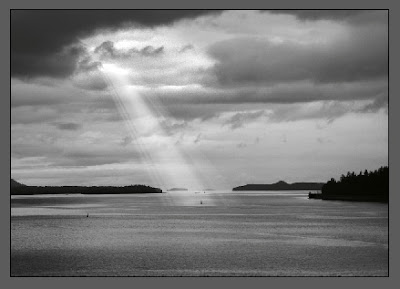
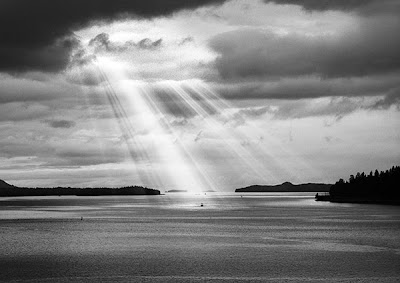
And here’s what we’re producing (Click the image for a larger version)


klik for enlarge pic


Step One:

Duplicate the Background photo layer by dragging it to the New Layer Icon at the bottom of the layers palette. Name it ‘Light Beam Base’.

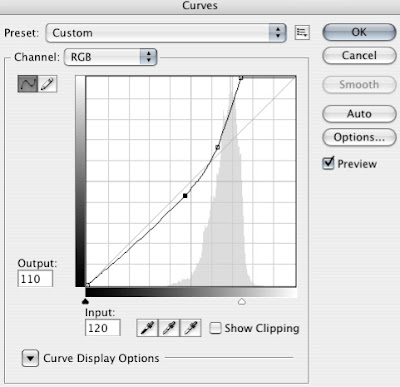
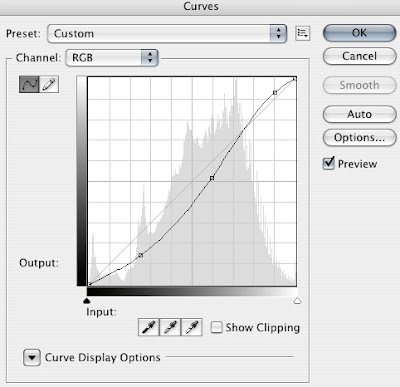
With that layer selected hit CMD + M (or CTRL+M on PC) to apply a curve to it. Apply a harsh curve to it so that we have maximum contrast in the clouds with small areas that go completely white. I am focusing on the area on the top third of the frame slightly to the left. These white areas are going to be where our beams of light come out of the clouds.
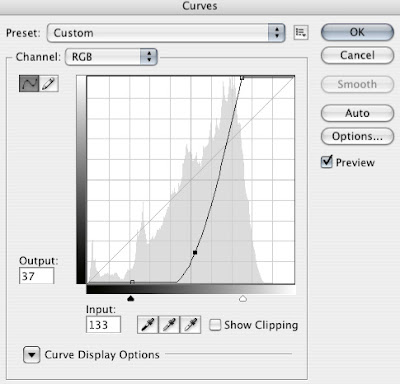

Now apply a 2 pixel gaussian blur to that layer (Filter > Blur > Gaussian Blur).
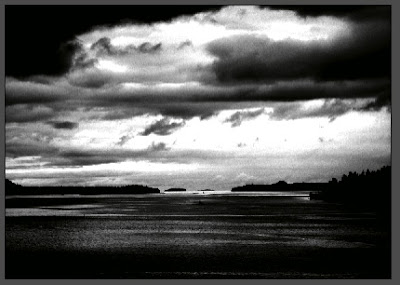


Step Two:

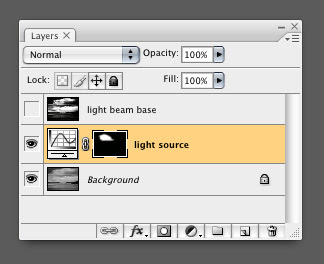
Turn off the Light Beam Base layer and select the Background layer. Select the Polygonal Lasso tool (L). Set the Feather to 50 in the Properties bar at the top of the screen.
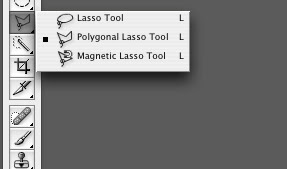

Draw a loose selection around the area of the sky where the beams will come from by clicking various points. Here is the selection I made as viewed in Quick Mask mode:
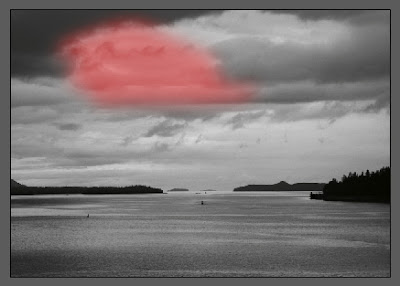


Make a new Curves Adjustment Layer just above he Background layer. Our selection is automatically applied as a layer mask. Apply a similar curve to the one we did before, but this time we want to limit it so the shadow areas are not affected. Name the layer ‘Light Source’.


Step Three:

Turn on and select the Light Beam Base layer. In the toolbar select the Single Row Marquee tool. Zoom in on one of the white areas of the clouds and click once in the middle of it. This selects a single row of pixels across the image.
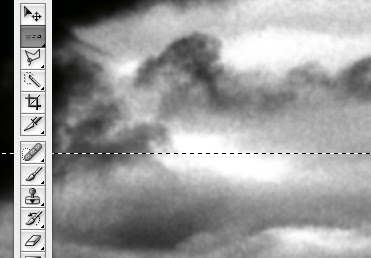


Zoom out so you can see the whole image. Select the regular Marquee tool. While holding alt/option drag from the left of the image right up to the left side of the white area to deselect those pixels. Do the same on the right side. You shoud end up with a selection of a single row of pixels just across the white area like so:
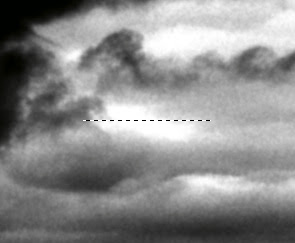

With the ‘Light Beam Base’ layer selected hit CMD + J. This throws your selected pixels on a new layer. Name that layer ‘Beam 1′.
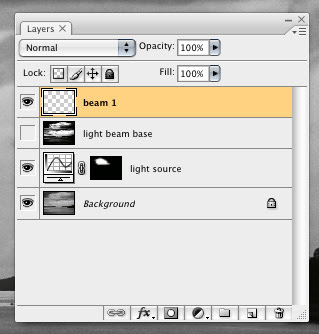


Step Four:

Turn off the ‘Light Beam Base’ layer. Select the ‘Beam 1′ layer. Hit CMD+T to Free Transform the layer. Grab the bottom center handle and stretch is all the way down to about where the boat sits. Now while holding CMD drag the same handle to the right so it sits just under the boat. Now while holding CMD+SHIFT drag the bottom left and right handles outward until you get a shape that you like.
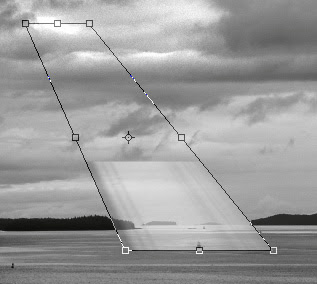

Note that the Free Transform preview might look a little whacked because Photoshop is dealing with a single row of pixels. This technique is called pixel stretching. When you apply the transform it will look right.
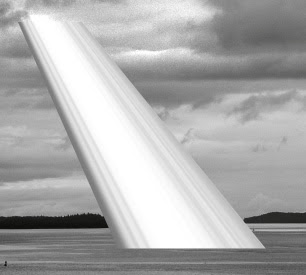


Step Five:

Set the ‘Beam 1′ layer’s blending mode to Screen on the layer palette.

Hit CMD+M to apply a curve to the layer. Darken the layer way down until the beams of light start to show up.
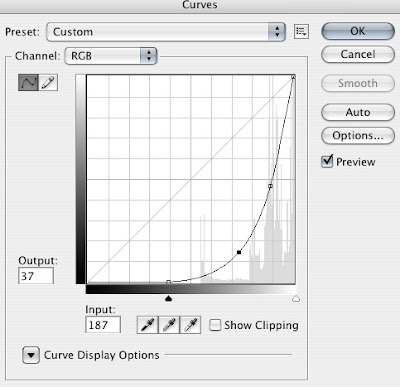

Add a layer mask by clicking on the Add Layer Mask button at the bottom of the layer palette. Select the mask by clicking on it in the layer palette then hit CMD+M to apply a curve to it. Bring the highlight point down to 50%. Hit OK.
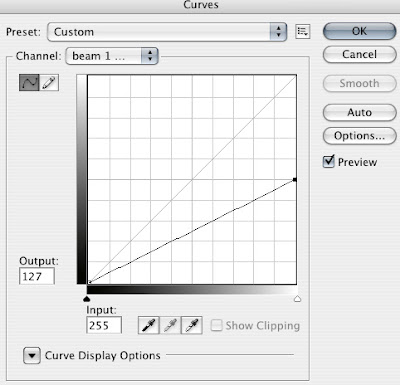

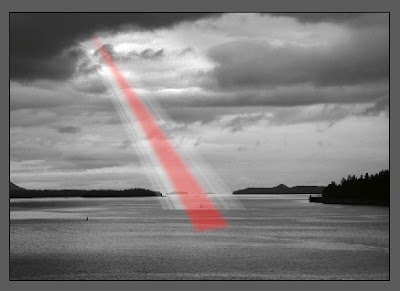
Select the Polygonal Lasso tool (L) and set the Feather to 15 this time. Select the center of the beam all the way through. Here is what my selection looked like as a quickmask.

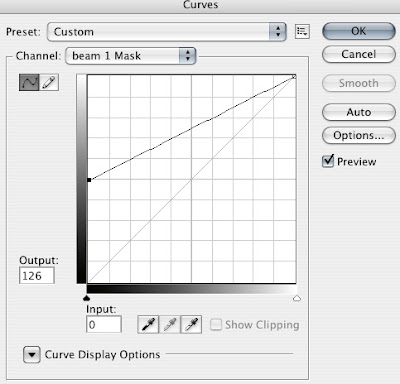
Select the ‘Beam 1′ mask and hit CMD+M to apply a curve. This time bring the shadow point up to 50%. This will make the center of the beam brighter than the edges.


Step Six:

With the mask still selected, hit G for the Gradient tool. Click on the gradient preview in the top left of the screen and set it to the black to white gradient if it isnt already set. Set the gradient mode to Multiply on the Properties Bar.

Drag from the top of the beam to the bottom. Before you click anything else go to Edit > Fade Gradient. Fade it down to about 50%. This creates a falloff on the beam but we use the Fade function so it doesn’t completely disappear at the bottom.


Step Seven:

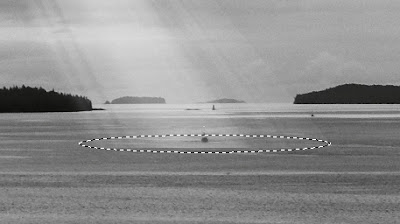
Select the Background layer. Select the Eliptical Marquee tool. Click and drag directly on the boat, while holding down the mouse button hold ALT and make a narrow ellipse at the base of the beam.

Hit Q to enter Quick Mask mode. Go Filter > Blur > Gaussian Blur and use 5 as the radius. Go Filter > Blur > Motion Blur and make the angle 0 and the distance 150. Hit Q to exit Quick Mask.

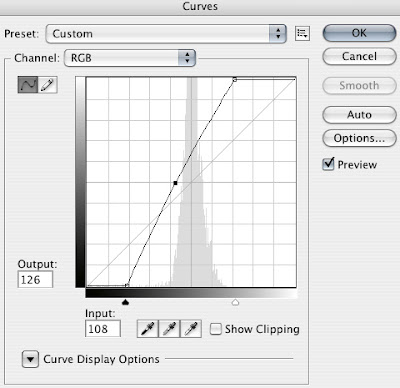
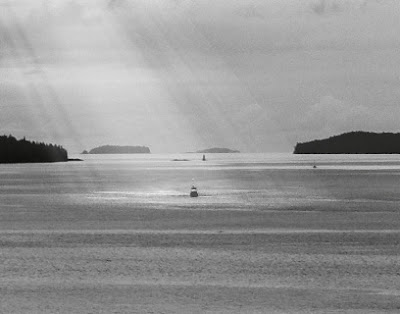
Make a curves adjustment layer just above the Background layer. Lighten up the water a bit until it looks like the beam is hitting the water.


Step Eight:

I just want to add a little contrast to the image as a whole. To do that, put a curve at the top of the layers palette and just add some contrast.

Repeat steps 3 through 7 as many times as you would like using other white spots in the clouds but be sure to mind the angles at which the beams come down. They should look like they all come from the same light source. I did 3 different beams to create my image.
25 Mei 2010

VECTOR : BANNER

Share


VECTOR : BANNER
Categories: Vectors » Objects

Detail:
1 AI | + JPEG Preview | 5.8 Mb RAR

nak?? tapi malu..
(klik sini) sedut je, ape ade hal

LOGO 2 : KEMPEM PREMEDASA 2010

Share

LOGO : KEMPEM PREMEDASA 2010

Share

TUTORIAL: EFFEK HURUF BERKACA & LUTSINAR

Share
final image


TUTORIAL: EFFEK HURUF BERKACA & LUTSINAR

Tutorial Details
* Completion Time: 1/2 hour
* Difficulty: Beginner
* Program: Photoshop


Dalam tutorial ini, kita akan menggunakan beberapa kesan layer super dan sedikit sentuhan magik tambahan untuk membuat gaya huruf seperti lutsinar.

Kerana menggunakan banyak layer, anda perlu memuat turun sampel PSD dari link di bahagian bawah tutorial untuk mengikutinya.


Step 1:

BACKGROUND LAYER

To begin this tutorial, we’ll first give ourselves a nice background gradient. Now while most gradients are two-color, in Photoshop you can actually make much more complex gradients by clicking on the Gradient icon in the top left. You’ll get a panel showing the gradient and you can add more colors to it. In this case, I’ve used three colors to make a gradual change from green to a set of blues.

Multi-color gradients can make for a stunning background. I’ve used a Radial Gradient and centered it to the bottom right.

The colors I’ve used are:

Color 1 – #2e5b15
Color 2 – #103533
Color 3 – #090e13

klik pic for enlarge


Step 2:

Now we need a letter. I’ve used the letter Q because it’s my favorite, particularly in this serifed style. This is from the font Adobe Caslon Pro which I suspect came with my Photoshop install–although who knows, I have way to many fonts to remember! Give your letter a nice blue- green color. I’ve used #41a993.

klik pic for enlarge


Step 3:

Now after this, I basically went through all the different types of layer styles and just experimented with them all. You can produce some really wicked combinations with a bit of trying out. The main things I did here were:

* Decrease Fill Opacity to 20%. Fill Opacity makes the layer transparent WITHOUT making the styles transparent. Note that this is DIFFERENT to Opacity which just makes everything see-through.
* Another thing I did was to try changing angles around, using different blending modes, and building the layers up slowly.

In any case, you can see all the exact settings by downloading the sample PSD file from the link on the top right. You can then right click that layer and hit Copy Layer Styles if you just want to paste it into your own file.

klik pic for enlarge


Step 4:

So here is the result of my layer styles. It’s a pretty cool-looking style.

Note that I’ve made it look as if the light is coming from the bottom. This matches the direction of my gradient and gives a convincing look. I’ve then also used a fainter set of highlights coming from the other side. This vaguely matches how glass sometimes reflects light about.

klik pic for enlarge


Step 5:

Now hold down Ctrl and click on the Q layer to select the shape and add a white to transparent gradient coming from the bottom into a NEW layer.

You can do color to transparent gradients by clicking on the Gradient Tool in the top left and holding it down to see the whole set of gradients (as we did earlier in this tutorial). The second one along is color to transparency. It’s SUCH a useful gradient. Great for this sort of glass/plastic effects in particular.

Now fade this back by changing its blend mode to Overlay.

klik pic for enlarge


Step 6:

Now again hold Ctrl and select the Q layer. In a new layer, again add a radial white to transparent gradient, this time coming from the top down as shown.

Fade this one out by setting its opacity to 40%.

klik pic for enlarge


Step 7:

Now on the same layer as in the last step, draw an ellipse with the Selection Tool and hit Ctrl+Shift+I to select the inverse. Then hit delete to remove some of that gradient that we just drew.

Basically this makes the white suddenly stop and gives us a glassy feel. Try cutting in different ways to see the different sort of effects you can make.

klik pic for enlarge


Step 8:

Now glass shines, so lets add some highlights to make it look really shiny. You can do this by choosing the Custom Shape Tool (U) and then in the top left click on Polygon and then on the down arrow to get options as shown. Tick Star and make sure your indent is set to 99% to make some nice little 5 pointed stars.

Now in a new layer with white as your foreground color, just add some highlighted stars liberally about. It’s best to place them on the most highlighted parts of the Q to make it look like they are sparkles from those highlights.

klik pic for enlarge


Step 9:

And there you have the finished product: a glassy lettering style.

klik pic for enlarge

24 Mei 2010

PEROGOL.... JUGA SUAMI - mymetro

Share
PEROGOL.... JUGA SUAMI - mymetro

ini cerita titanic, tak cukup sedih


KUALA TERENGGANU: Hanya kerana mahu menutup malu keluarga selepas anaknya dirogol dan mengandung anak luar nikah, seorang bapa sanggup mengahwinkan anak gadisnya itu dengan perogol terbabit, walaupun menyedari tindakannya itu bakal menjerat diri.
Ternyata, tindakannya itu tidak menyelesaikan masalah berkenaan, malah menyebabkan mangsa fobia dan trauma akibat dirogol selain terpaksa berdepan perogolnya yang juga suaminya.

Untuk memastikan dirinya tidak diganggu, mangsa sanggup menyembunyikan diri kerana takut berdepan suaminya itu.

Lebih malang, mangsa juga terpaksa menanggung malu bersendirian selepas pelbagai tohmahan dilemparkan jiran kerana mendakwa dirinya gadis liar dan mengandung anak haram.

..........

bayangkan hari2 malang yg akn terus dtempuhinya. hari2 seterusnya yg tiada siapa akn tahu sudahnya. lelehknlah air mata darah sekali pun. duka tdk sesekali mereput. duka tdk pernah mudah untuk luput. berdoalah atas kesejahteraan diri. doa kamu adalah doa yg akn dmakbulkan. tabah lah kerna masa depan pasti akn lebih baik. doaku..


KISAH MASYARAKAT YANG DIKETEPI

KISAH YANG LEBIH MENYENTUH HATI DARI TITANIC

KISAH CERITA MANUSIA YANG TIADA SIAPA AMBIL PEDULI
KISAH CERITA INSAN BER-AYAH, BER-IBU TP MEMENTINGKN AIR MUKA

KISAH CERITA TRAGIS MENDEPANI PEROGOL YG 'HALAL' KE ATASNYA
KISAH TRAGIK MAHA DUKALARA SEORANG PEREMPUAN

KISAH YG DPT MERUNTUN JIWA
MANUSIA SEJAGAT
INILAH KISAH LARA MANUSIA TANPA PLIHAN


AIR MATA AKU HALAL UNTUK JATUH..
Related Posts Plugin for WordPress, Blogger...